
For this post I’ll be doing a high level overview of how to master completely in the box, using only stock plugins. This post is good for producers, and mixers looking to get started mastering. It’s a difficult art, but it is not as hard as you think it is to get started.
High Level Goals
The first step is to figure out what we want to do with our mastering chain. Typically you should be working on a finished mix, or on the final chain before the song is exported. Here are the 3 basic things I look for when starting to do a basic master
- Clean up unwanted frequencies, boost good sounding frequencies (if necessary)
- Make song sound more “together”
- Make loud
It may be tempting to load up some presets, but the problem with mastering presets, especially when you aren’t sure of what every module is doing, is that they are highly dependent on the source material. Presets can be a good place to start, but will require tweaking to tailor to each track. In this tutorial, I’ll do everything from scratch to show the steps and thought process.
Baseline
Here is the finished released version.
Here is the unmastered snipped from “Moonside”
Basic Chain 1
For the first mastering chain, all we are going to do is add a limiter. I’ll use the Abelton stock limiter, and leave default settings for now. Im shooting for 1-3db of limiting max. The higher you push it the louder your song will get, but at some point it will appear as if its not really getting louder, just worst sounding. The more you see the gain reduction meter going, the worse your track will sound, so you need to figure out where the balance is between loud, and distorted. The amount of gain added doesn’t really matter here, what matters is how much the gain reduction meter is showing. The meter here is a bit deceptive, because 3db is 1/2 the power, meaning 3db IS A LOT. I would never go over 6db of reduction on a master.
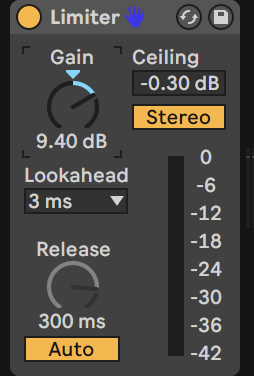
Limiter settings
Now lets get into a little more detail with the limiter settings. There are 2 basic controls we can use on a mastering limiter. Some have more, which I will go over in a different post. For now lets look at Lookahead, and Release time. In general faster lookahead is louder, at the expense of more distortion sounding. If I turn the lookahead down it will sound a little punchier. I may have to adjust the gain again to have the same amount of gain reduction. Take a listen to this master with the look ahead all the way fast.
1.5 Ms Relase:
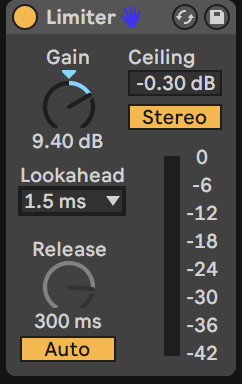
Next let’s look at the release knob. This one is similar to lookahead, faster is louder/punchier, slower is smoother, quieter. In this example, it’s set to fastest lookahead, and fastest release, so most punchy.
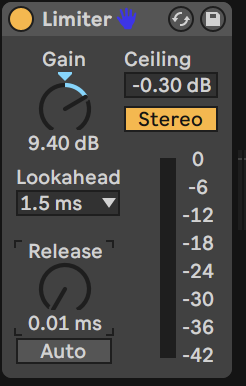
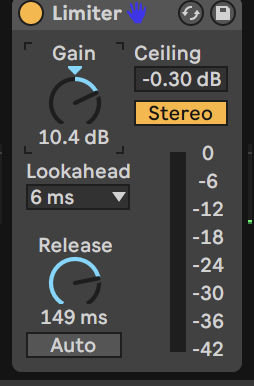
Next I’ll do the exact opposite, slow lookahead, slow release. In this case I had to adjust the gain so that the overall gain reduction was about the same. The differences can be subtle so you may need to listen on high quality headphones or monitors. Pay close attention to how the limiter reacts to the kick drum, when it smooths out you hear the volume kind of dip together with the drums. I would describe it as more “round” or “smoothed”. In the punchy one, the kick can hit kind of independent of the instruments without affecting them too much.
There is a sort of tricky tradeoff here where using the smoother settings require more gain to get the same gain reduction to get the same perceived volume, but since there is more gain reduction, it might sound more distorted.
If at this point your song sounds good, leave it alone! You may not need to pile on more plugins just for the sake of it. A common mistake is to just start adding more plugins just because you can, and not because you are trying to achieve something.
Basic Chain 2
Next, let’s introduce an equalizer. The goal with the equalizer is to remove unwanted frequencies and very carefully boost some wanted frequencies. Usually you don’t want to be doing large boosts or cuts anywhere. If there is an instrument sticking out, fix it in the mix, not with eq. For mastering eq, I like using a mid/side eq. First I’ll start with the sides. Im going to carve out the low end so that I keep the bass in tact, but basically make it mono. I don’t want to high pass the center, even at 20Hz, a cutoff at 20Hz means its already reducing 3db. You may not be able to tell on headphones, but if you have a sub, or club speakers, you need the 20Hz. I’ll also bump the sides up a little bit on the high end to add some excitement. Notice the extra high end makes it a little more sparkly!
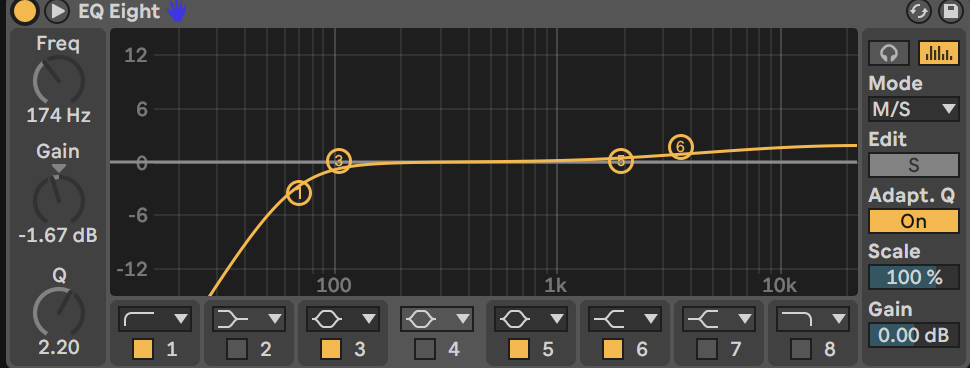
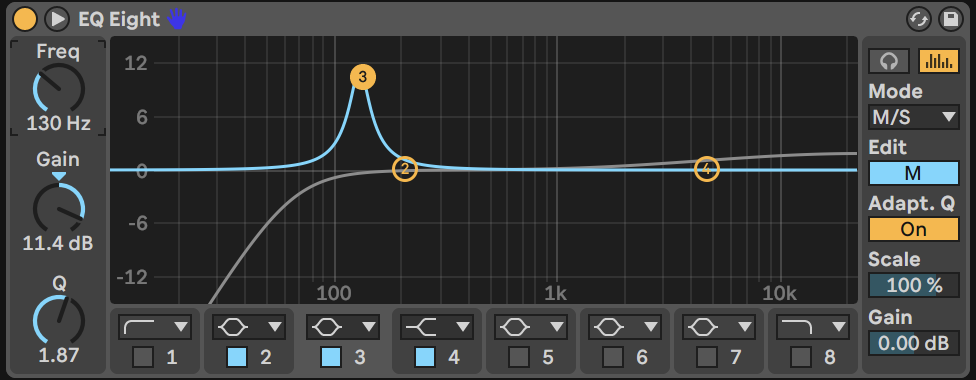
Next, what I like to do is switch to either the middle channels, or stereo linked (abelton eq doesn’t let you do both together) and use a narrow band to sweep around and find if there are any muddy spots. Found one here at about 130Hz. Basically look to see if there are any spots that sound super bad when boosted. You may not need this step. If you find that there are many spots, go back and fix it in the mix. This is a very blunt instrument and affects all tracks together, so think of this as finding spots where you get some extra buildup from all the instruments combined. After finding the muddy spot, simply reduce the gain here, but not so much that it sounds hollow or weak.
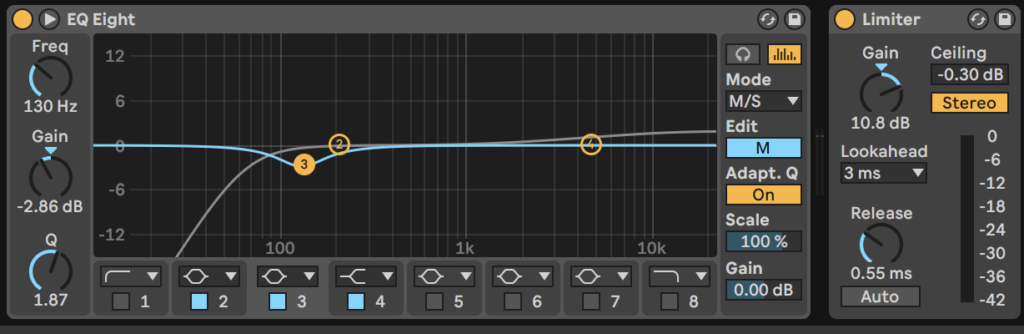
Here is the full chain I’m using at this point. The cut at 130 is in the middle, and the filter and shelf are on the side frequencies. Using medium settings on limiter, and thats it for this chain!
Basic Chain 3
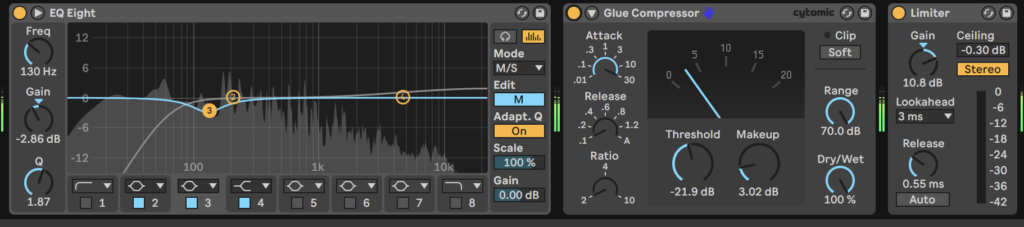
Now I’ll add the last ingredient to the chain, the compressor. The job of the compressor is to add “glue” and by glue I mean make it sound like all the instruments are being played together. We saw in an earlier example that the release setting on the limiter can affect how the volume of one instrument affects the others. We want the volumes of the individual instruments to subtle affect each-other so they sound like they are together. In a real environment, when multiple sounds play in a room, they bounce off surfaces and interact withe each other, giving them a sense of togetherness that we don’t get if they are recorded separate. The objective with this plugin is not to add loudness, but “fullness”. I’ll use the glue compressor for this example.
For mastering compressor settings, you typically want a low ratio, low gain reduction, maybe only 1-2db. Slow attacks, and quick releases. Quick attacks will catch transients and make them sound smoother, but can dull out your track. When I go for punchy tracks I always do slowest attack, quickest release. I’ll go a bit extreme on these two examples so the difference is more obvious. You want to adjust the threshold to get the desired gain reduction, then adjust the makeup knob so the volume is the same. Toggle the active button on/off to make sure the before/after loudness is the same.
Next I’ll do the other extreme with the smooth settings. The sweet spot will likely be somewhere in the middle. You also never want to overdo this or else you can get obvious sounding dips in the audio when instruments come in and out.

Wrapping Up
To start off with mastering you own music, you don’t need fancy plugins, or presets. You can start with 3 simple tools, and mostly just listening. Don’t change stuff just for the sake of changing stuff. Often times if you don’t know what a plugin does, its better to leave it out because it can make things sound worse. Less is more, most of the time. Keep eq moves small, and deliberate. Practice until your are confident with these 3 plugins before moving on to more!